Flaunt It
 Tickled By
♥Missy♥
Tickled By
♥Missy♥


This tutorial was written for those who have a working
knowledge of PSP
For my tutorials I use PSP 9 and Animation Shop
Supplies needed
Tube and close up of choice
I am using artwork by Keith Garvey. You can purchase this
tube from PSP Tubes Emporium
Texture of choice - you can find plenty by searching on
DeviantArt
Heart Animation here
Fonts of choice - I am using Asuka Caps SSK, bit dust1 and
lhf bounce script
Filters
Filter Factory Gallery D-Vertigo
Alien Skin-Xenofex 2-consellation-settings of choice
Penta.com-color dot
L en K landksiteofwonders-L en K's Zitah
VM Extravaganza - transmission
Adjust-Variations
Don't forget to save often!
Let's get started
New Canvas 675 x 250 - set your foreground colour to #ffffff
and background colour to #000000
Click on the foreground colour to bring up the materials
tab
Select the gradient tab-use the following settings
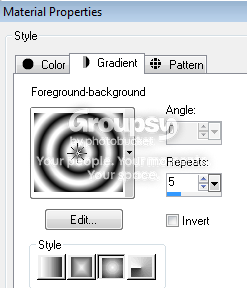
Flood fill your canvas with this gradient
Adjust-blur-gaussian blur-radius 15.00-click ok
Open up your tube and close up of choice
Arrange these as below
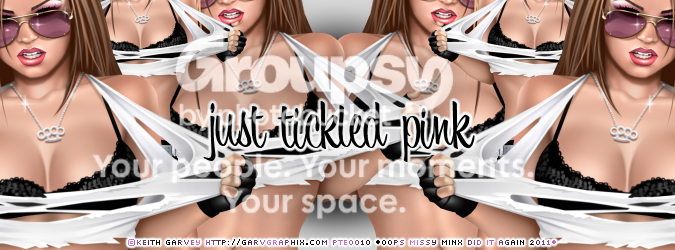
Close off the gradient filled layer-merge visible the tube layers
Reopen the gradient filled layer
Duplicate the merged tube layer twice
On one of the duplicated layers-edit-cut-paste as new image
-we will work on this later so now back to your main canvas
On the duplicated merged layer-adjust-blur-gaussian blur-
radius 5.00-click ok-change the blend mode to hard light
Duplicate this layer and change the blend mode to screen-
lower the opacity to around 58
Duplicate this layer-change the blend mode to soft light
Adjust-blur-radical blur-use the following settings
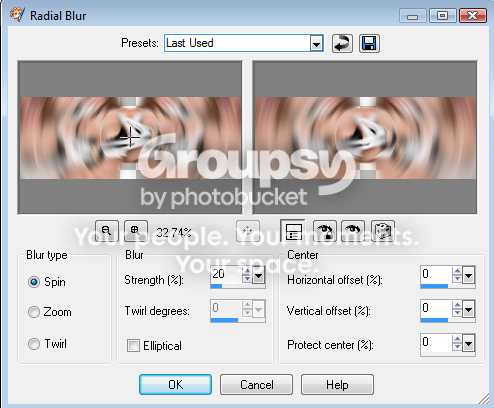
Lower the opacity to around 74
Open up your texture of choice-colourize it if necessary
The one I used was already a pinky/purple colour so I didn't
colourize it
Copy and paste this onto your canvas
Change the blend mode to screen or play about with the blend
modes to get the effect you like
You should have something like below- it may differ due to using different textures

You should have something like below- it may differ due to using different textures
Remember earlier that duplicated layer we pasted as a new
image-we will now be working on that
New raster layer-flood fill with black
Move this layer below the merged tubed layer
Duplicate the merged tubed layer-adjust-blur-gaussian blur-
radius 5.00-change the blend mode to screen then back onto
the original merged layer and change the blend mode to
Luminance (L)
Edit-copy merged-back to your main canvas-edit-paste as new
layer-image-resize by 80%
It should settle in the center of your canvas
Effects-plugins-Adjust-Variations-select more magenta-click
ok
Duplicate this layer-adjust-blur-gaussian blur-radius 3.00-change the blend mode to screen and lower the opacity to
around 40
Effects-plugins-L en K landksiteofwonders-L en K's zitah-
default settings
On the original center layer-selections-select all-float-
defloat-selections-modify-expand by 3.00-new raster layer-
flood fill with black-selections-select none
On the black flood filled layer-using the selection tool-set
on rectangle-draw a rectangle selection around the top
border-see below
With this selected-effects-plugins-penta.com-color dot
Default settings-click ok-selections none
Repeat this for the border below
Repeat again for the borders on the left and right but using
a different filter-VM extravaganza-transmission
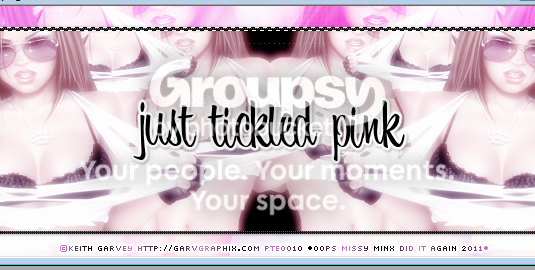
You should now have something like below

You may now add any wording to your banner
I added some wording to the center and some circled wording
to the background-play about with the opacity and blend
modes on your wording to achieve the effect you like
Add drop shadow 1, 1, 30, 3.00 black to your wording
I also added some pixel wording but this is entirely up to
you
Copy and paste your main tube of choice and arrange this in
the center-selections-select all-float-defloat-selections-
modify-expand by 3.00-new raster layer-flood fill with
white-selections-select none-move this layer just below your
tube-drop shadow 1, 1, 30, 3.00 black
Duplicate your tube layer-adjust-blur-gaussian blur-radius
3.00-change the blend mode to soft light
Duplicate this layer-change the blend mode to screen-lower
the opacity to around 58-effects-plugins-Adjust-Variations-
more magenta-and hit lighter-click ok
Select the gradient filled layer from the beginning (should
be your very last layer)-selections-select all-float-
defloat-selections-modify-select selection borders-use the
following settings
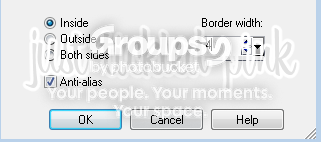
New raster layer-flood fill with black
Selections-select none-move this layer to the very top
Repeat the above for another border but change the border
width to 6-flood fill with white
For the black border repeat what we did to the center
borders
You can now add your name using a font of choice-I am using
hf bounce script
Also now is the time to credit your tag and add proper
artist info
Now let's animate
We will be animating the background and the white border
So select your texture
layer
Effects-plugins-Filter Factory Gallery D-Vertigo-move the
intensity up to 30-click ok
Select the white border layer-effects-Alien Skin-Xenofex 2-
consellation-settings of choice-click ok
Edit-copy merged-open up Animation Shop-paste as new
animation-back to PSP-hit undo-until you are back on the
texture layer before we added vertigo
Go to the Vertigo filter again-change the intensity to 50-
click ok-add your consellation to your white border-don't
forget to hit random
Edit-copy merged-back to AS-paste after current frame-back
to PSP and repeat the above until you have 8 frames in
AS
Here are my intensity settings I used each time after the
50-75, 100, 120, 136, 153 and 168-don't forget to keep
adding the consellation to your white border-hitting random
each time
Now you should have 8 frames in AS-test your animation and
once happy save as .gif or .mng if you want to add names at
a later date
Now its time to make your avatar
Back to PSP-new canvas 150 x 150-flood fill with white-on my
banner canvas I closed off the center layers then copy
merged the banner
Paste this onto your avatar canvas
Arrange and place where desired
Next we are going to add the borders-see the above tut for
adding the borders as its the same
Add any wording if you like
Using a font of choice-add your name and any cr info
Now to animate
I added noise to her necklace but this is optional
Select the white border frame-Alien Skin-Xenofex 2-
consellation-settings of choice
Edit-copy merged-over to AS-paste as new animation
Back to PSP-hit undo-repeat your consellation settings but
hit random
Back to AS-paste after current frame
Return to PSP-repeat one more time
You should now have 3 frames in AS-edit-select all
Open up the heart animation supplied-you will see it only
has 2 frames-copy the first frame then select the 2nd frame
-edit-paste after current frame-now the heart will have 3
frames
Edit-select all-edit-copy-over to your avatar frames-edit-
paste into selected frame-arrange where desired-paste the
heart again if you wish-you will see my avatar has 2 hearts
on it but this is up to you
Once happy test your avatar then save as .gif or .mng to add
names later on
Thanks for trying my tutorial. I hope you enjoyed it!
This tutorial was written on 7th March 2011.
The concept of the tutorial is copyrighted.
Feel free to link to the tutorial and or print out for your
personal use.
But please do not copy it in any way to put online, pass
out, or rewrite without permission.
The image you create using this tutorial is for you do to as
you wish except for monetary gain or for merchandising.
©Just T!ckled P!nk 2007-2011. Any resemblance to another
tutorial is purely coincidental.
Proud member of TWI
 Labels:
Flaunt It
Labels:
Flaunt It
Subscribe to:
Post Comments (Atom)
-♥-My TOU-♥-
All of my tutorials are copyrighted.
Feel free to link to the tutorial in your groups and or print out for your personal use.
But please do not copy it in any way to put online, pass out, or rewrite without permission.
The image you create using this tutorial is for you do to as you wish except for monetary gain or for merchandising. However, just because you did my tutorials that does not give you the right to go and tut your results. Unfortunately that has happened to me. Tut writers please do not use my exact settings in your tutorials please make up your own :)
By staying on my blog and doing my tutorials you are agreeing to my TOU.
©Just T!ckled P!nk 2007-2011. Any resemblance to another tutorial is purely coincidental.


0 comments:
Post a Comment