Biatchitude

This tutorial was written for those
that have a working knowledge of PSP.
Supplies Needed:
PSP 9 (any version will work)
Tube of choice and a close up
I used artwork by Ismael Rac
If you would like to use his artwork please visit his store here
I bought this tube when Ismael was at AMI
Photo frame #9 by Dozi Baer which you can get from here
Tag template #269 by me you can get this from my blog here
Splat brushes of choice
Fonts of choice - I am using Will & Grace and FFF Urban
Filters used
Eye candy 4000 - Gradient Glow
VanDerLee - Unplugged X - Interlace
Richard Rosenman - Grid Generator
MuRas Meister - Copies
Lets get started
Open up my tag template-image-canvas size-change the width and height to 700 x 700-click ok
Close off the copyright layer
Select the oval shape layer-selections-select all-float-defloat
New raster layer-flood fill with #ff48a7-selections-select none
Adjust-blur-gaussian blur-change the radius to 20.00
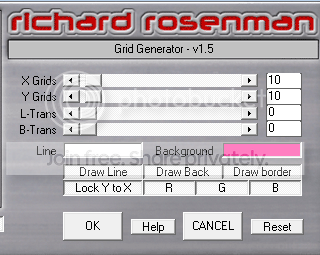
Rotate left by 15.00-effects-plugins-Richard Rosenman - Grid Generator
Use the following settings
Move this layer below the glitter oval layer
Select the circle layer-selections-select all-float-defloat
Open up your close up of choice-copy and paste this onto the selected area
Arrange to the right of the circle-selections-invert-hit delete
Change the blend mode to luminance (L)-lower the opacity to around 22
Open up Dozi Baer's photo frame-resize by 80%
Copy and paste this over to your canvas
Using the freehand selection tool-make a selection around 2 of the frames
See below

New raster layer-change your foreground to #ff48a7 and background to #ffffff
Click the foreground colour to bring up the material properties
Select the gradient tab-use the following settings

Flood fill the selected area with the gradient
Move this layer below the frame-keep selected
Copy and paste your close up again-arrange over the selected area
Selections-invert-hit delete-selections-select none
Duplicate the close up layer-on the duplicated layer
Adjust-blur-gaussian blur-radius 3.00-change the blend mode to soft light
Effects-plugins-VanDerLee - Unplugged X - Interlace-default settings
Using a pixel font of choice-add the words 'I Got The Biatchitude'
Objects-align-center in canvas-convert to raster
Effects-plugins-MuRas Meister - Copies-using the following settings

Close this layer for now
Using the freehand selection tool again-make a selection around the first frame
New raster layer-flood fill with the gradient using the following settings

Open up your tube of choice-image-mirror
Copy and paste this onto your canvas-arrange over the selected frame
Selections-invert-hit delete-change the blend mode to luminance (L)
Open up the words we did earlier-hit delete-change the blend mode to color (L)
Make sure this layer is above your tube layer
Copy and paste your main tube of choice-arrange in the centre of your tag
Erasing any excess-add drop shadow of 0, 0, 40, 10.26 black
Add any splat brushes of choice if desired
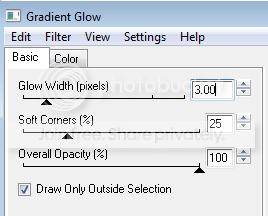
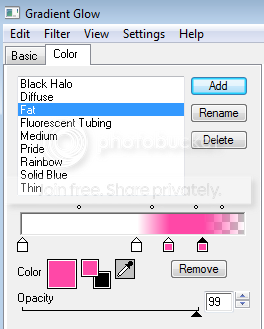
Select the circle layer-effects-plugins-eye candy 4000 - Gradient Glow
Use the following settings
Using a font of choice-I am using Will & Grace-add your name to your tag
Arrange at the bottom-add drop shadow 0, 0, 40, 10.26 black
Also using a pixel font of choice-I am using FFF Urban-add any other words-see tag above
Crop and resize your tag if needed-add proper copyright info then save your tag as .png
Thanks for trying my tutorial. I hope you have enjoyed it.
This tutorial was written on 7th October 2009.
The concept of the tutorial is copyrighted.
Feel free to link to the tutorial and or print out for your personal use.
But please do not copy it in any way to put online, pass out, or rewrite without permission.
The image you create using this tutorial is for you do to as you wish except for monetary gain or for merchandising.
©Just T!ckled P!nk 2007-2011. Any resemblance to another tutorial is purely coincidental.
Proud member of TWI

Subscribe to:
Post Comments (Atom)
-♥-My TOU-♥-
All of my tutorials are copyrighted.
Feel free to link to the tutorial in your groups and or print out for your personal use.
But please do not copy it in any way to put online, pass out, or rewrite without permission.
The image you create using this tutorial is for you do to as you wish except for monetary gain or for merchandising. However, just because you did my tutorials that does not give you the right to go and tut your results. Unfortunately that has happened to me. Tut writers please do not use my exact settings in your tutorials please make up your own :)
By staying on my blog and doing my tutorials you are agreeing to my TOU.
©Just T!ckled P!nk 2007-2011. Any resemblance to another tutorial is purely coincidental.

0 comments:
Post a Comment