Bad Attitude
 Tickled By
♥Missy♥
Tickled By
♥Missy♥
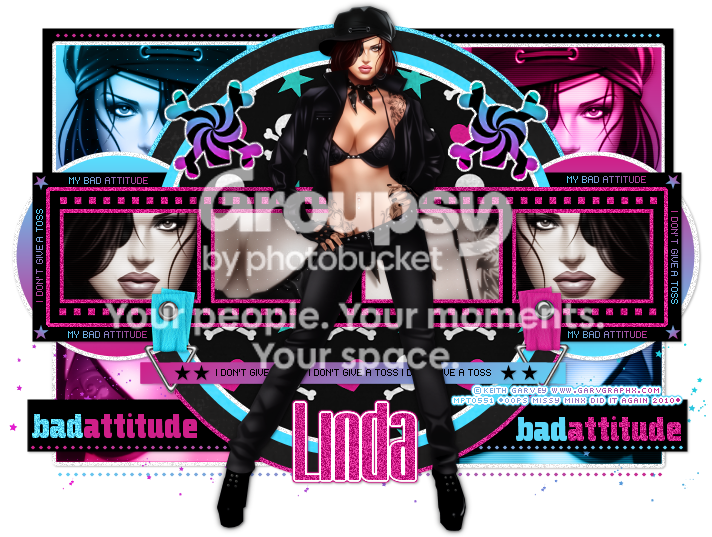
This tutorial was written for those
that have a working knowledge of PSP.
Supplies Needed:
PSP 9 (any version will work)
Tube of choice and a close up
I used artwork by Keith Garvey
If you would like to use his artwork please visit PSP Tubes Emporium
I bought this tube from MPT
Tag template #335 by me you can get this from my blog here
Scrap kit by Kristin here
It is a PTU one
Font of choice - I am using SF Iron Gothic
Filters used
Eye candy 4000 - Gradient Glow
Penta.com - color dot
VanDerLee - Unplugged X - Interlace
Lets get started
Open up my tag template-image-canvas size-change the width and height to 750x 700-click ok
Close off the copyright layer
Select the rectangle shape left layer-selections-select all-float-defloat
Open up your close up of choice-copy and paste this onto your canvas
Arrange over the selected area-selections-invert-hit delete
Selections-select none-duplicate the close up layer-adjust-blur-gaussian blur-radius 3.00
Change the blend mode to soft light-on the original close up layer
Change the blend mode to Luminance (L)
Back on the duplicated close up layer
Effects-plugins-penta.com-color dot-use the following settings
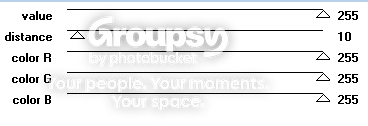
Repeat the above for the rectangle shape right layer
Except do not add the filter penta.com-color dot
You want to add VanDerLee - Unplugged X - Interlace-default settings
Select circle 1 layer-selections-select all-float-defloat
Open up paper 1 from the kit-copy and paste this onto your canvas
Arrange over the selected area-selections-invert-hit delete
Selections-none-delete the original circle layer
Repeat the above for circle 2 layer but use paper 4 from the kit
Repeat the above again for circle 3 layer but using paper 6 from the kit
I actually used a different paper from her Riot kit but paper 6 will work for this
Open up the filmstrip from the kit-copy and paste this onto your tag
It should sit nicely in the center of my template
Using the magic wand-select the center of each of the square shapes on the frame
Selections-modify expand by 2.00-new raster layer-flood fill with black
Move this layer below the frame layer
Back on the frame layer-selections-select all-float-defloat-selections-expand by 4.00
New raster layer-flood fill with #ca288e-selections-select none
Move this layer below the film strip layer
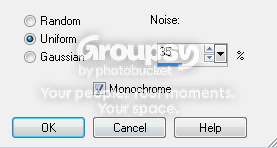
Adjust-add/remove noise-add noise-use following settings
Select the film strip layer again
Using your magic wand select the first square on the frame
Selections-modify expand by 2.00
Copy and paste your close up of choice-arrange over the selected area
Selections-invert hit delete-select none
Duplicate the close up layer-adjust-blur-gaussian blur-radius 3.00
Change the blend mode to soft light-on the original close up layer
Change the blend mode to Luminance (L)
Back on the duplicated close up layer
Add the filter-VanDerLee - Unplugged X - Interlace-default settings
Repeat the above for the remaining squares
But on the center 2 squares I added the color dot filter-same settings as above
Now you can add any elements of choice from the kit
I added candy 2 and the buckles-I recoloured one of the buckles to match my tag
I also added the small scattered stars element from the kit-arrange this at the bottom of your tag if you use
Copy and paste your tube of choice-arrange this in the center of your tag
Duplicate-adjust-gaussian blur-radius 3.00
Change the blend mode to soft light
On the original tube layer add drop shadow of 1, 1, 30, 3.00 black
Using a font of choice-I am using SF Iron Gothic
I added gradient glow to it also
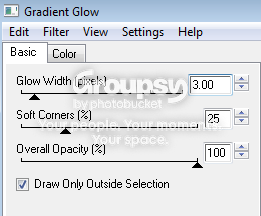
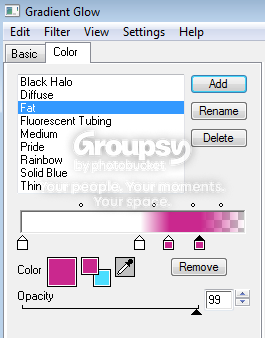
Drop shadow 1, 1, 30, 3.00 black
Crop and resize your tag if needed-add proper copyright info then save your tag as .png
Thanks for trying my tutorial. I hope you have enjoyed it.
This tutorial was written on 5th March 2010.
The concept of the tutorial is copyrighted.
Feel free to link to the tutorial and or print out for your personal use.
But please do not copy it in any way to put online, pass out, or rewrite without permission.
The image you create using this tutorial is for you do to as you wish except for monetary gain or for merchandising.
©Just T!ckled P!nk 2007-2011. Any resemblance to another tutorial is purely coincidental.
Proud member of TWI

 Labels:
Bad Attitude
Labels:
Bad Attitude
Subscribe to:
Post Comments (Atom)
-♥-My TOU-♥-
All of my tutorials are copyrighted.
Feel free to link to the tutorial in your groups and or print out for your personal use.
But please do not copy it in any way to put online, pass out, or rewrite without permission.
The image you create using this tutorial is for you do to as you wish except for monetary gain or for merchandising. However, just because you did my tutorials that does not give you the right to go and tut your results. Unfortunately that has happened to me. Tut writers please do not use my exact settings in your tutorials please make up your own :)
By staying on my blog and doing my tutorials you are agreeing to my TOU.
©Just T!ckled P!nk 2007-2011. Any resemblance to another tutorial is purely coincidental.

1 comments:
Hi missy love your site do you have any tags you can share with me? my name is Melissa/Missy as well, thank you
Post a Comment